The role of the rechargeable LED flashlight is very large, whether it is in the wild camping, or in the home and travel it can bring great convenience. Today, TANK007 wants to introduce you how to use diy flashlight parts to make a rechargeable led flashlight steps, and with a detailed flashlight productions pictures. Friends who are interested in making a led flashlight and love DIY LED flashlight production can also try it at home.
Preparation tools and diy flashlight parts before making a rechargeable LED flashlight:
Before making a rechargeable led flashlight, you first need to prepare the tools you need during the flashlight production process, including electric welding, electric soldering iron, rosin, solder, tweezers, etc. In addition, the diy flashlight parts required in the LED flashlight production project must also be prepared in advance, including the flashlight casing, led lights, circuit boards, thermal silica gel, rechargeable batteries and so on. Once you have prepared these diy flashlight parts and tools, you can start making rechargeable led flashlight.
The flashlight soldering tools are as follows:

Flashlight making tools and the diy flashlight parts need to be selected according to your needs
The following rechargeable led flashlight production requires parts as a reference:

Led flashlight detailed production steps:
step 1: take out the circuit compartment of the flashlight, and then pass the two leads of the wire through the small holes. There are some circuit compartments that vary in size from the flashlight’s circuit size, and we need to make the appropriate modifications.
step 2: it is necessary to apply thermal silica gel on the circuit compartment of the flashlight, and then put the rechargeable flashlight led lamp beads on, and then you can carry out the corresponding welding production work. Pay attention to the direction of the positive and negative electrodes when soldering the led flashlight. Never solder it wrong.
step 3: after the rechargeable led flashlight welding is completed, a simple power-on test is required. If everything is normal, the led flashlight can be normally lit, and we are inside the flashlight case.
step 4: after the led flashlight circuit compartment is installed, if you use a metal light cup, you need to put an insulating sheet on the led. Finally, install some flashlight parts and tighten them.
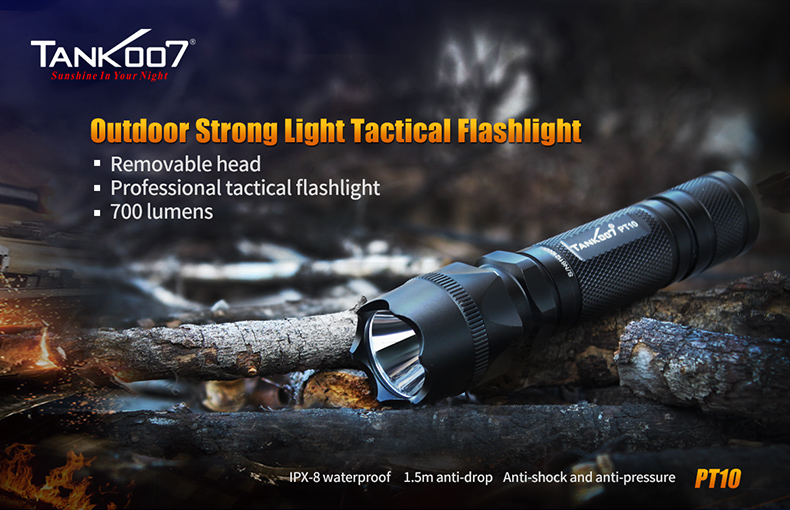
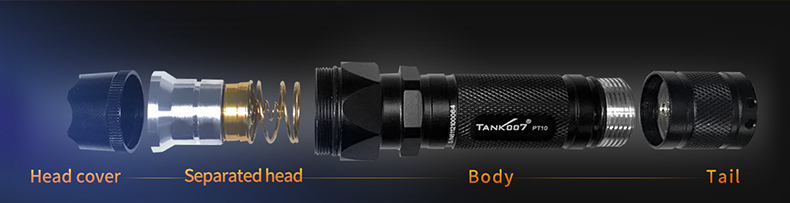
TANK007’s PT10 rechargeable led flashlight adopts diy lamp head design, the flashlight head can be disassembled at will, the light cup and lamp bead and the circuit compartment can be replaced. DIY making charging led flashlight is more flexible and simpler.
The above is the production steps of rechargeable led flashlight, not very complicated, friends who like DIY flashlight production, you can try it, of course, you can also directly purchase DIY freely assembled flashlight for modification. If you don’t feel comfortable making the effect, it is recommended to buy an assembleable flashlight. You can visit the TANK007 website and buy your favorite flashlight.https://www.tank007.com/
Other Method of using diy flashlight parts to make a rechargeable LED flashlight manufacturing steps Video:
Production base:3F, Education Industry Building, No. 38, Liuxian 1st Road, Baoan District, Shenzhen, Guangdong Province, China
CALL:+86-15994827007
E-MAIL:[email protected]

Production base:3F, Education Industry Building, No. 38, Liuxian 1st Road, Baoan District, Shenzhen, Guangdong Province, China
CALL:+86- 15994827007
E-MAIL:[email protected]
UV Torch | UV Light Flashlight | Police Flashlight | UV Flashlight Black Light | LED Flashlight Wholesale | UV Flashlight
Copyright 2002-2022 Shenzhen Grandoor Electronics Co., Ltd. (Tank007)粤ICP备10078715号